


Lucy
MacDougall
BALMORAL HALL SCHOOL FOR GIRLS|Winnipeg, Manitoba, Canada
Teacher: Kristina Karlsson
3-D Art and Design

Knight of Riverbend, View 1|62 x 18 x 8 in.
Idea(s): FULL BODY. Culmination of all the work done this year. The pieces are displayed on a homemade stand.
Material(s): Sheet metal, sharpie, scissors, previously-created templates, ruler, brass paper brads - rivets
Process(es): Used wood to make the stand. Wrapped it in bubble wrap to beef up the places where the armor sits.

View 2
Student statement
Student
statement
A visit to the armor floor of the New York Met Museum provided the inception of an idea for the Knight of Riverbend and he came to life this past year as my project for AP Art and Design.
I spent a good portion of the year sketching out my designs on paper and figuring out which designs were to my liking and which were not. The most difficult area was coming up with designs that were realistic for me to create considering the limited tools and materials I had access to.
To make the armor plates, I used scrap sheet metal that had been donated to my school. The sheet metal is thin, but it holds a bend, which was very helpful for making the limb pieces. The sheets are leftover metal from making circuit boards, which is why there are multiple little holes and designs imprinted in the metal. Some of the metal was shiny, and some of it was matte, and I worked these traits into my designs.
Working in 3-D definitely had its challenges. For each armor piece, I had to figure out how to transfer my 2-D design on paper to a 3-D piece. To do this, I made templates with paper and duct tape in reference to my own body so I knew how to cut each part out of the metal. This step ensured that all the pieces would fit together. When I made my templates, I put them on my body and sketched out guide-lines on them so I could see what worked best with the curves of each limb. Many of the templates required adjustments before I could make the final metal pieces. In particular, the helmet, and the hands especially, required many modifications.
A lot of people ask me what style of armor I was basing mine on, and the answer is that I did not have any style in mind. My designs were determined mostly by practicality; both for what I could actually make, with the material I had, and, as well, what would work with the curves of each body part being made.
To avoid having to glue or weld the pieces together, I used brass paper brads as rivets. I spent some time working on the best way to utilize the rivets and figured out that first punching a hole through the metal with a hammer and a nail was the most effective way to proceed.
One of the most time-consuming pieces of this project ended up being the stand on which it is displayed. I made it in lieu of using a mannequin, as finding a mannequin the size of the armor, was not possible. I used pieces of scrap wood that I had at home, again, modeled after my own body proportions.
Overall, it was a very long process, but I learned so much from working on it. I know I will never find the Knight of Riverbend displayed at the Met, but I am very pleased with the final result. And, if it is true that a knighthood is a prestigious title given to an honorable person for his bravery, then Sir Riverbend, who allowed me to build him, piece by piece, from scraps of metal, certainly deserves his title.

Lucy MacDougall
Lucy MacDougall delivers The Knight of Riverbend to school

Untitled|6.5 x 4 x 1.5 in.
Idea(s): HAND. Wanted this piece to be functional and to show off all the joints in the fingers.
Material(s): Sheet metal, pliers, sharpie, scissors, previously-created templates, black gloves
Process(es): I put the glove on my hand before gluing it so that the pieces would be proportionally placed.

Process Work

Helmet, View 1|6.5 x 4 x 1.5 in.
Idea(s): HELMET. Wanted this piece to be the crowning jewel of the armor, and to tie all the pieces together.
Material(s): Sheet metal, sharpie, scissors, previously-created templates, ruler, brass paper brads - rivets
Process(es): Face mask was challenging where I had to crease the metal. I did this by pressing on a metal ruler.
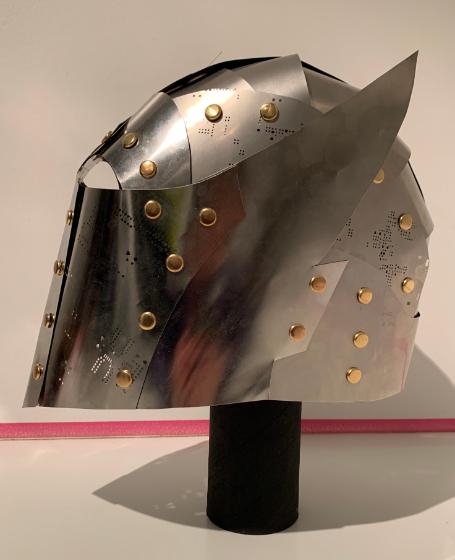
Helmet, view 2
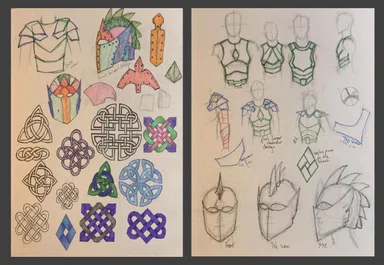
Untitled|11 x 17 in.
Material(s): Pigment liners, HB pencil, pencil crayons, sketchbook paper
Process(es): Process work - design sketches
Picked a design. Drew different angles to better imagine 3-D shape.
Teacher
statement
Kristina Karlsson
I am immensely proud of Lucy for being recognized through this exhibition after teaching her art over the past 9 years. I have enjoyed watching Lucy’s love of mythology and fantasy-themed art grow and evolve right up to Lucy's cycle-couriering ‘Knight of Riverbend’ through neighborhood streets and up to the front doors of Balmoral Hall (as per the accompanying video). This image will forever be etched into my memory. The best part of this experience was that this was the first time I got to see Lucy’s finished project in person.
Creating a project of this magnitude was no small feat, especially as Lucy did not have the use of the art room and needed to create ‘Knight of Riverbend’ primarily from home. Through this yearlong investigation, Lucy developed an impressive list of skills including inquiry and problem-solving, armor construction techniques, metal fabrication, armature-building, and pattern-making strategies needed to convert flat sheet metal into impressively articulated three-dimensional forms. It was particularly inspiring to observe Lucy figure out how to use tape and paper held up to her own body to trace made-to-order templates, steps which would be repeated throughout the year. We saw snippets of this epic figure coming together with occasional snapshots of Lucy’s home-based armor factory where classroom experiments and research were put to task. In class, drawing skills were honed with medieval knotwork studies and increasingly sophisticated explorations of fantastical creatures and human figures. Ongoing classroom critiques, both in-person and online, brought out much feedback, discussion, encouragement, and problem-solving to help encourage and push Lucy towards the final assembly of online slides, photo-documented and ready for submission.
Lucy’s feat of excellence is amplified while looking at the array of obstacles presented by COVID. For example, art classes this year took place in every imaginable space apart from our freshly built art facility, including interesting art room anomalies as the library, theatre, geography room, physics lab, and even our own homes. One might assume these space restrictions and obstacles would result in sub-standard art projects. Lucy’s project is a testament that this is not the case at all, that the freedom and individualized research nature of AP Drawing, AP 2D Art and Design, and AP 3D Art and Design courses made it easy for all students to adapt to a year of uncertainty. Throw in some additional victories, such as our very well subscribed virtual 24/7 critiquing board and I would say this year was a success, for Lucy and for all of us. And in a post-COVID world, we will continue to keep some of these gems, including Lucy’s monumental artwork, for as long as Lucy will allow!
Congratulations, Lucy! See you in AP Drawing where you will be the first student at our school to enroll in a 3rd AP art course!
Principal
statement
Jodi Hafenbrak
I have had the pleasure of watching Lucy grow as an art student for many years. She continues to amaze me with the depth of her talent. She has successfully completed two AP art courses and has refined and grown her skills in a variety of different art forms. This project is especially impressive as it was completed as a year-long project at home and at school during COVID when students were learning remotely at times during the school year. In all her work, Lucy captures the audience’s attention with colour, technique, and her message. With the support of our AP art teacher, Kristina Karlsson, students like Lucy can explore their passions and develop their ideas using different techniques and media. I am very excited to see what direction Lucy will go next with her art as she finishes in next AP course during her last year of high school.
Lucy MacDougall